"A Crochet Nightmare Before Christmas: A Spooky and Festive DIY Project"
"A Crochet Nightmare Before Christmas: A Spooky and Festive DIY Project"
Introduction
In this auspicious occasion, we are delighted to delve into the intriguing topic related to "A Crochet Nightmare Before Christmas: A Spooky and Festive DIY Project". Let’s weave interesting information and offer fresh perspectives to the readers.
Table of Content
"A Crochet Nightmare Before Christmas: A Spooky and Festive DIY Project"
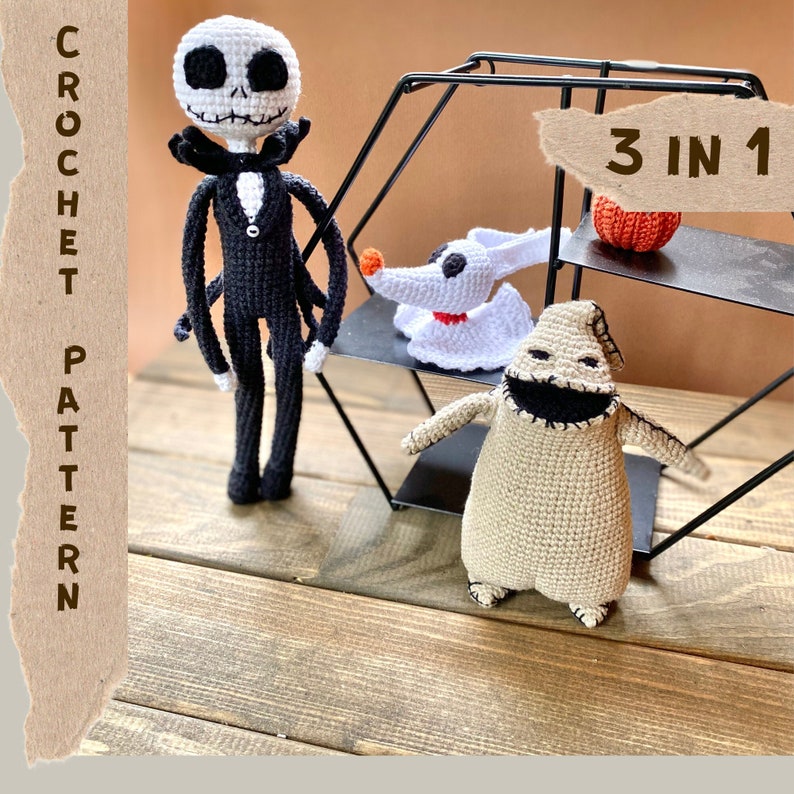
As the holiday season approaches, many of us are looking for creative ways to get into the festive spirit. For fans of Tim Burton’s beloved movie "The Nightmare Before Christmas," crocheting some of the iconic characters can be a fun and rewarding DIY project. In this article, we’ll guide you through the process of making some of the most iconic characters from the movie using crochet techniques.
Materials Needed:
- Crochet hook ( Size J/6.0mm or K/6.5mm)
- Medium weight yarn ( white, black, purple, yellow, and orange)
- Stuffing material ( Polyester fiberfill)
- Scissors
- Stitch markers
- Black embroidery floss
- White embroidery floss
- Yellow and orange felt (for eyes and nose)
- Hot glue gun (optional)
Character Patterns:
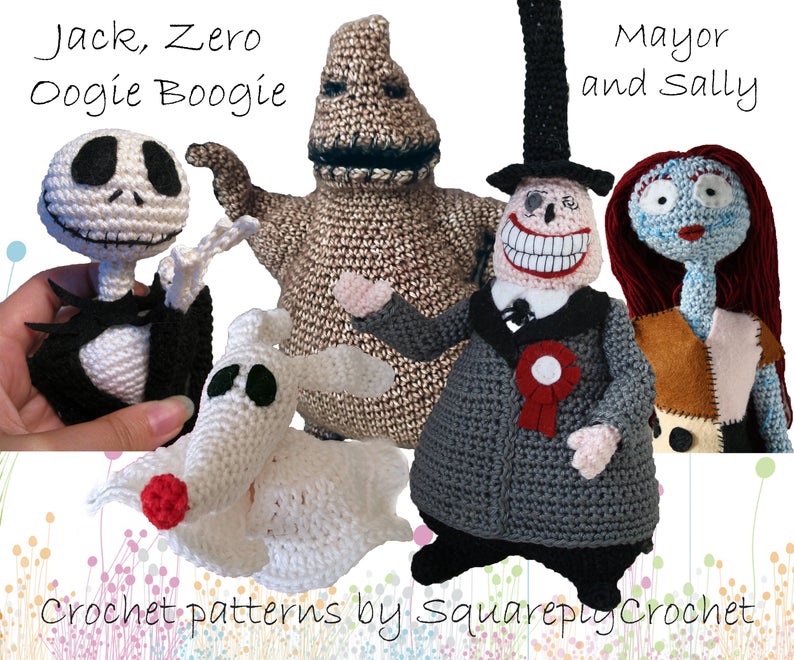
We’ll be focusing on the following characters:
- Jack Skellington (main character)
- Sally (the rag doll)
- Oogie Boogie (the villain)
- Zero (Jack’s ghost dog)
- Santa Claus (the guest from Christmas Town)
Each character requires a specific set of instructions and yarn colors. Let’s start with Zero, the lovable ghost dog.
Zero the Ghost Dog Pattern:
Head:
Row 1: Using white yarn, make a magic ring and crochet 6 single crochet stitches (sc) into the ring.
Row 2-3: Increase (inc) in each stitch around (12 stitches).
Row 4-5: sc in each stitch around (12 stitches).
Body:
Row 1: Using white yarn, make a magic ring and crochet 6 sc into the ring.
Row 2-3: Increase in each stitch around (12 stitches).
Row 4-5: sc in each stitch around (12 stitches).
Ears:
Row 1: Using white yarn, make a magic ring and crochet 4 sc into the ring.
Row 2-3: Increase in each stitch around (8 stitches).
Row 4-5: sc in each stitch around (8 stitches).
Tail:
Row 1: Using white yarn, make a magic ring and crochet 2 sc into the ring.
Row 2-3: Increase in each stitch around (4 stitches).
Row 4-5: sc in each stitch around (4 stitches).
Assembly:
Using a hot glue gun (optional), attach the ears and tail to the head and body.
Ghostly Details:
Using a black marker or embroidery floss, draw or stitch a mouth and nose on Zero’s face. You can also add some white details to create a ghostly effect.
Jack Skellington Pattern:
Head:
Row 1: Using white yarn, make a magic ring and crochet 6 single crochet stitches (sc) into the ring.
Row 2-3: Increase (inc) in each stitch around (12 stitches).
Row 4-5: sc in each stitch around (12 stitches).
Body:
Row 1: Using white yarn, make a magic ring and crochet 6 sc into the ring.
Row 2-3: Increase in each stitch around (12 stitches).
Row 4-5: sc in each stitch around (12 stitches).
Bows:
Row 1: Using black yarn, make a magic ring and crochet 2 sc into the ring.
Row 2-3: Increase in each stitch around (4 stitches).
Row 4-5: sc in each stitch around (4 stitches).
Assembly:
Using a hot glue gun (optional), attach the bows to the head and body.
Sally the Rag Doll Pattern:
Head:
Row 1: Using white yarn, make a magic ring and crochet 6 single crochet stitches (sc) into the ring.
Row 2-3: Increase (inc) in each stitch around (12 stitches).
Row 4-5: sc in each stitch around (12 stitches).
Body:
Row 1: Using white yarn, make a magic ring and crochet 6 sc into the ring.
Row 2-3: Increase in each stitch around (12 stitches).
Row 4-5: sc in each stitch around (12 stitches).
Arms and Legs:
Row 1: Using white yarn, make a magic ring and crochet 2 sc into the ring.
Row 2-3: Increase in each stitch around (4 stitches).
Row 4-5: sc in each stitch around (4 stitches).
Assembly:
Using a hot glue gun (optional), attach the arms and legs to the body.
Stitching Details:
Using a black marker or embroidery floss, draw or stitch some details on Sally’s face, such as eyes, nose, and mouth.
Oogie Boogie Pattern:
Body:
Row 1: Using purple yarn, make a magic ring and crochet 6 single crochet stitches (sc) into the ring.
Row 2-3: Increase (inc) in each stitch around (12 stitches).
Row 4-5: sc in each stitch around (12 stitches).
Eyes:
Row 1: Using yellow yarn, make a magic ring and crochet 2 sc into the ring.
Row 2-3: Increase in each stitch around (4 stitches).
Row 4-5: sc in each stitch around (4 stitches).
Mouth:
Row 1: Using black yarn, make a magic ring and crochet 2 sc into the ring.
Row 2-3: Increase in each stitch around (4 stitches).
Row 4-5: sc in each stitch around (4 stitches).
Assembly:
Using a hot glue gun (optional), attach the eyes and mouth to the body.
Santa Claus Pattern:
Head:
Row 1: Using white yarn, make a magic ring and crochet 6 single crochet stitches (sc) into the ring.
Row 2-3: Increase (inc) in each stitch around (12 stitches).
Row 4-5: sc in each stitch around (12 stitches).
Beard:
Row 1: Using white yarn, make a magic ring and crochet 2 sc into the ring.
Row 2-3: Increase in each stitch around (4 stitches).
Row 4-5: sc in each stitch around (4 stitches).
Assembly:
Using a hot glue gun (optional), attach the beard to the head.
Tips and Variations:
- Use different yarn colors to create unique and personalized characters.
- Experiment with different stitches and techniques to add more details to your characters.
- Don’t be afraid to add your own creative touch and personality to the project.
Conclusion:
With these easy-to-follow patterns and instructions, you can create a spooky and festive "Nightmare Before Christmas" crochet collection. Zero, Jack, Sally, Oogie Boogie, and Santa Claus are just a few of the iconic characters from the movie that you can bring to life using crochet techniques. Don’t hesitate to experiment and try new things, and most importantly, have fun!


Closure
Thus, we hope this article has provided valuable insights into "A Crochet Nightmare Before Christmas: A Spooky and Festive DIY Project". We thank you for taking the time to read this article. See you in our next article!
Leave a Reply